Archive for Tech
Authy review for Nosillacast
Hello Nosillacast listeners, this is Joe lagreca from San Diego, California
Problem to be solved:
Two-factor Authentication is great from a security standpoint. However from an ease of use standpoint it can be a little frustrating. It can get annoying pulling your phone out to get a security token. Or worse yet you can lose your security tokens if you have to replace your iPhone. So I never liked having my tokens in only one place or device. Â
Solution:
The solution is a program AND cloud service called Authy (authy.com/app/). Â It is a Google authenticator replacement that gives you access to your security tokens across multiple devices. People might say having your tokens in the cloud is less secure, and while that is partially true, I feel the benefits outweigh the detriments.
The first step is to install Authy on your various devices. They support IOS and Android and also have Chrome plugins. The next step is to create an Authy account. Creating an Authy account requires a  phone number and Email address.  Verification for account setup can be sent either via phone call or SMS.
Once your account is setup, its use is very similar to that of Google Authenticator. When you enable two-factor Authentication for your various services they will show you a QR code to scan. You simply open Authy on your  device ( preferably a phone  or iPad so you can use its camera) and click add account.  That will bring up a screen to scan a QR code (or you can key it in manually if you choose to). Once you scan the QR code, it will then provide you with your 2FA token. Â
This is where things are different from Google Authenticator. Instead of your tokens only being on one device, they are now synced and shared in the Authy cloud across all your devices. Authy secures your tokens with a master password.   In iOS,  touch ID can be used when  accessing the Authy app.  Â
Now when I need a token I can either access it from a Chrome extension on my computer, my phone, my iPad, or any other device I have Authy installed. Â Â While surfing the web on my computer I no longer have to pull my phone out of my pocket to get my security tokens. This is also very useful when I have to get my phone replaced. I no longer have to disable and re-enable two-factor authentication across all my services. Â I simply download the Authy app, authenticate, and all my tokens are available!
Side note:
While I do use 1password and know it can handle two-factor authentication I don’t like the idea of “having all my eggs in one basketâ€. The whole point of 2 Factor Authentication is to keep two  separate pieces of information. I feel that keeping those two separate pieces of information in the same place is not as secure.
You know iOS 9 is buggy when…
Even your father is calling you up and complaining about the new bugs he is finding…
iOS 9 spotlight problems
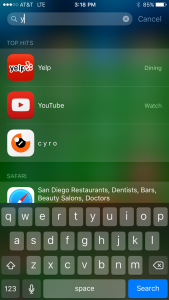
I just updated my iPhone 6 to iOS 9 and have had inconsistent spotlight results ever since.  I often use spotlight to launch apps.  As you can see from my screenshots, if I simply type a “Y”, the intended Yelp app shows up in the results:
However, if I type anything beyond “Y”, such as “YE”, I get NO results: Â 
I’m also having problems using spotlight on iOS to find contacts. Â I’ll type in a contact name, and either nobody will show up, or a very rarely contacted person with the same first name will show up, but the intended contact will never show up. Â If I go into the contacts app and search for the person, they show up. Â I’d post screenshots, but they have too much personal information.
Is anyone else having similar problems?
RV RiteTemp 6030 thermostat upgrade
I got tired of the wide temperature swings, and guess what temperature I was setting, from our analog thermostat in the RV and decided to swap it out.  I have had a RiteTemp thermostat in our house for years and love it, so I decided to get one for the RV.  I went down to Home Depot and picked up a RiteTemp 6030.

First thing I had to do was figure out how to hook the wires up to the new thermostat. Â The existing wires were not labeled, so I had to work backwards from the existing thermostat manual to label the wires.
The very first thing I did was take a few pictures, to document it in its working form, in case things don’t work out, I can always revert back.
Coleman Mach (original install diagram)
The RiteTemp install for my setup was to be like this:
RiteTemp <-> RV wires
————————–
YÂ <->Â Y
GÂ <->Â GH & GL (high and low fan speed together, basically loosing low speed capability)
WÂ <->Â W
N/AÂ <->Â B (B or negative 12 volts was not to be used)
RHÂ <->Â RH
Set the jumpers on RiteTemp 6030 to:
1. Empty
2. Jumper
3. Empty
4. Empty
5. Jumper
However the A/C fan would not turn on in this configuration. Â A day later, and many hours pondering what was wrong, I figured out I needed to connect the “unused” blue wire to the mysterious large white wire (presumed to be ground). Â As soon as that was done, the A/C fan fired right up and everything worked as it should.
Now that everything is functional, I need to go back and clean up my installation.  I need to remove each wire and trim it down so bare wire isn’t exposed.  I also would like to use some electrical tape around the wiring bundle to prevent it from ever coming apart on its own.  And last, I need to find some stand off’s to put behind the RiteTemp, so it not only fits better in the previous enclosure, but also allows better airflow around it to sense temperature more accurately.
I did this writeup for anyone else that may attempt to replace their thermostat with a standard house thermostat. Â What helped me was reading other peoples posts on how they got their setup working. Â I figured I would do the same thing for anyone else struggling with their install. Â If you have questions, let me know!
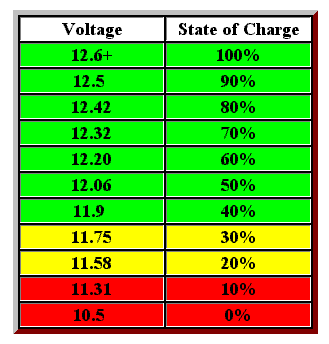
Battery voltage chart
This chart is a batter voltage reference for RV’ers:

Avoid discharging the battery below the 40% level whenever possible.

